Your Natuzzi, Poltrona Frau, Fendi Casa, or B&B Italia sofa has faded, lifted, or lost colour , and the fix you choose will either leave it looking original or leave it looking painted. Micro-pigmentation is what separates those two outcomes. It is not artistry. It is engineered chemistry: micron-thin translucent pigment passes, matched binder lock, top-coat lamination cured against the original gloss profile. This article walks through the seven-step process experts use on every panel-level fix. The steps are the same whether the damage came from vinegar misapplication, ten years of UV exposure in a Gurugram penthouse, or pigment lift on a semi-aniline B&B Italia armrest. Get all seven steps right, and the restored panel becomes part of your sofa's history. Get one wrong, and the failure shows from across the room.
What Is Micro-Pigmentation on Leather?
The term gets used loosely. The technical definition is narrow. Micro-pigmentation is the controlled deposit of translucent pigment systems onto a leather surface in micron-thin passes , typically three to seven microns per pass, with three to nine passes per panel. The pigment bonds to the hide through a matched acrylic-urethane binder system. A clear top-coat lamination matched to the gloss profile of the surrounding undamaged hide seals everything.
What sets micro-pigmentation apart from painting leather is not the equipment. It is the chemistry of the pigment itself. Expert-grade micro-pigments are built to work with the hide's surface , they accept the natural pore structure, follow the grain pattern, and shift tone as the leather flexes and ages. Your sofa develops patina after restoration the same way it did before. Painted leather sits above the hide as a separate opaque layer. It produces the dead, plastic look that owners of Italian luxury furniture spot immediately.
The vocabulary of the craft matters too. A piece is not "repainted" , it is re-pigmented. Pigment is not "applied" , it is laid down. The work is not "touch-up" , it is panel reconstruction. The words a technician uses signal the standard they work to.
The quick check: if a provider quotes a flat per-panel rate and shows you bottles marked "leather paint," your sofa is being painted, not micro-pigmented. The two services produce different results, last different lengths of time, and protect , or destroy , different amounts of the heirloom value of the hide underneath.
Does Your Sofa Actually Need Re-Pigmentation?
Not every type of damage needs re-pigmentation. A workshop assessment separates cases into three categories.
1. Surface contamination , no pigmentation needed
Skin oil build-up, dust, light residue, and most monsoon-related fat bloom sit on the surface only. pH-neutral deep extraction and re-fatliquoring [the process that replaces oils lost from the hide] fixes all of these without touching the pigment layer. Many owners arrive expecting to be quoted re-pigmentation. The honest answer is no , expert cleaning solves the problem at a fraction of the cost.
2. Panel-level damage , panel micro-pigmentation needed
Pigment lift on one armrest, a water ring on the seat front, ink transfer on a back cushion, fade on a south-facing panel, or top-coat micro-cracking in one zone , all are candidates for panel-level micro-pigmentation. The damaged area is mapped. The surrounding undamaged hide becomes the colour reference. The pigment layer is rebuilt panel by panel. After the integration period, the join between original and restored becomes invisible.
3. Whole-piece damage , full re-pigmentation needed
Multi-panel pigment failure, pieces that have lost tonal consistency across decades, or sofas salvaged from serious damage (long-term wrong-pH cleaning, vinegar use, prolonged UV exposure across the full seating surface) need whole-piece re-pigmentation. The colour target shifts: instead of matching the surrounding undamaged hide, the technician matches the original tannery formulation through documented colour archives. For Frau Pelle SC that means matching against the 27 Pelle SC reference colours. For Natuzzi nappa, the brand's documented palette. For Fendi Casa Selleria, the proprietary tonal range.
This distinction matters because owners often arrive expecting one category and the assessment recommends another. Surface damage should not be re-pigmented. Panel damage should not be expanded to whole-piece scope. A full guide on which damage belongs to which fix is in the foundation article on aniline, semi-aniline, and pigmented finish identification.
What Are the Seven Steps of Micro-Pigmentation?
The steps below are the expert-grade sequence used on every micro-pigmentation job. They run in order. Compressing two steps, skipping a cure window, or using lower-grade equipment all show up in raking light within the first year.
Stage 1 , Tonal mapping and reference capture
Before any chemistry touches the hide, the whole piece is photographed at 1:1 macro scale under matched D65 daylight in the workshop colour-reference box. Each panel gets a tonal map: the dominant base tone, secondary modulation tones, the natural variation range, and the highlight-to-shadow spread under raking light. This map becomes the target for pigment formulation in stage three.
For panel-level jobs, the tonal target comes from the surrounding undamaged hide. For whole-piece jobs, it comes from the documented original tannery formulation. For aniline pieces with significant patina, the target includes the patina layer , the goal is to integrate, not reset the timeline. Stage one takes 90 minutes to two hours per piece.
Stage 2 , Surface preparation and stabilisation
The hide must be chemically clean and dimensionally stable before pigmentation starts. Surface preparation follows the seven-step pH-neutral deep-pore extraction in the pH balance guide, with longer dwell times for restoration scope, deeper extraction, and full removal of any residual silicone, beeswax, or oxidised plant oil left by previous home treatments.
After extraction, the hide stabilises at 50% relative humidity for 24 to 48 hours. This lets moisture from the extraction release and the fibre matrix return to its dry-state shape before pigment goes down. Rushing this step causes uneven pigment absorption in stage four , a failure that does not show at handover but appears in the first three months of use.
Stage 3 , Pigment formulation and additive matching
The expert pigment system is built additively from a base palette of roughly 40 reference tones. The technician matches the stage-one target through controlled additive layering , each additive shifts the tonal balance by a small, measurable amount. The match is checked against the matched reference under D65 light, then against the actual hide in workshop conditions, then again in raking light.
This is where the gap between micro-pigmentation and leather painting is widest. Painted leather uses a pre-mixed pigment from a finite catalogue. Micro-pigmentation builds the pigment for your specific sofa in the workshop. That is why the same tonal signature can be repeated across heritage Frau Pelle SC pieces from different decades, even when the original tannery formulation drifted slightly.
Stage 4 , Pigment application by HVLP micro-spray
Pigment is laid down with an HVLP , high-volume, low-pressure , micro-spray system set to deposit three to seven microns per pass. The technician works panel by panel in light overlapping passes that follow the natural grain. Each pass flash-dries under controlled airflow before the next one goes down.
The number of passes depends on how severe the damage is. A panel with light fade may get three passes , enough to restore tonal uniformity without hiding the patina underneath. A panel with structural pigment failure may get seven to nine passes, rebuilding the colour layer from the substrate up. The total laid-down thickness target is 15 to 30 microns , the same range as the original semi-aniline finish on most Italian nappa.
Stage 5 , Binder lock and cross-linking
The pigment passes are sealed and bonded to the hide through a matched acrylic-urethane binder system. The binder cross-links to the leather collagen and to the pigment matrix. This bond is what gives a correctly executed micro-pigmentation its 25-to-40-year life. Binder goes on by hand with a soft conservation cloth, or by HVLP at fine atomisation. The choice depends on the gloss target , high-gloss pieces use spray, low-gloss heritage pieces use hand application for finer control.
Binder cure runs 4 to 6 hours under infrared cure lamps at controlled temperature. If the panel is handled too early, fingerprint-shaped voids form in the binder layer. These cannot be fixed without redoing the whole panel.
Stage 6 , Top-coat lamination at matched gloss
The final layer is a clear protective top-coat matched to the gloss profile of the surrounding undamaged hide. Italian nappa typically sits in the 8 to 15 percent gloss range , anything above 20 percent reads as artificial. The top-coat goes on in two thin passes. The first cures before the second goes down. Dust management runs throughout. A single particle of dust trapped in the top-coat shows as a visible defect in raking light and means the panel must be re-laminated.
The top-coat also determines abrasion resistance, water beading, and how the panel ages over time. A correctly matched top-coat means the restored panel ages at the same rate as the original hide beside it. A mismatched top-coat means your sofa will visibly diverge within five to seven years.
Stage 7 , Cure window and final inspection
The finished panel cures under controlled conditions for 48 hours before inspection. Inspection runs under three lighting conditions: matched D65 daylight, raking light at low angle, and ambient warm-tone lighting matching a typical Indian living room. The boundary between restored and original is checked to be invisible under all three before your sofa leaves the workshop.
For heritage pieces, inspection includes a documentation pass , macro photography of the restored panel matched against the pre-restoration tonal map, filed under the piece's project number. This archive supports any future work on the same piece. It also forms part of the provenance record that keeps your sofa's history traceable.
How Do You Match Colour on Frau, Natuzzi, or Fendi?
Italian luxury furniture brands each have a documented colour signature. Matching against the brand reference , not just the hide in front of the technician , is what sets expert micro-pigmentation apart from generic leather refinishing. Here is how the workshop approaches the four brands most commonly seen in Delhi NCR.
Poltrona Frau Pelle SC
The Pelle SC range across the Frau, Heritage, and SC series covers 27 documented colours. Each has a slightly different binder formulation produced at the Tolentino tannery in central Italy. The workshop matches against the Pelle SC reference card , a matched set of swatches checked against the additive layering in stage three. A 1995 Frau armchair and a 2024 Frau armchair in the same colour will read slightly differently because the tannery formulation drifts over time. The restoration targets your sofa's date of manufacture, not today's production reference.
Natuzzi nappa palette
Natuzzi sources hides from a network of European tanneries and produces nappa across the Iconic, Re-Vive, and Editions ranges. The palette is broader than Frau and the natural variation per panel is wider on full-grain aniline pieces. Matching focuses on the per-panel reference rather than a brand-wide formulation. Natuzzi pieces are often more forgiving to restore because the original tonal variation gives natural cover for slight match deviations. For nappa-specific failure modes and restoration steps, see the dedicated nappa leather restoration guide.
Fendi Casa Selleria
Fendi Casa's Selleria line uses the same hide stock as Fendi luggage, finished at the deliberately minimal end of the aniline spectrum. Matching is the most demanding of the major brands because there is no opaque pigment layer to provide cover , the pigment must integrate with the dye in the fibre, not sit above it. Selleria restorations typically need nine-pass micro-pigmentation versus three passes for heavier finishes.
B&B Italia and Maxalto
The B&B Italia range , Husk, Tufty-Time, Charles, Mart, Camaleonda, plus the Maxalto sub-brand , uses Italian semi-aniline nappa with a 20-to-25-micron pigment coat. The matched binder for B&B's finishing system is the closest to the workshop's standard formulation. These pieces are the most reproducible to restore. The variation between pieces is narrower, the binder accepts the expert restoration system reliably, and the integration period is the shortest of the four major brands , usually three to four months instead of six to twelve.
How to Spot a Shortcut Job Before It's Too Late
Most "leather restoration" services advertised in Delhi NCR are not micro-pigmentation. The signs of a shortcut job appear within twelve to eighteen months and become structural failures within three to five years.
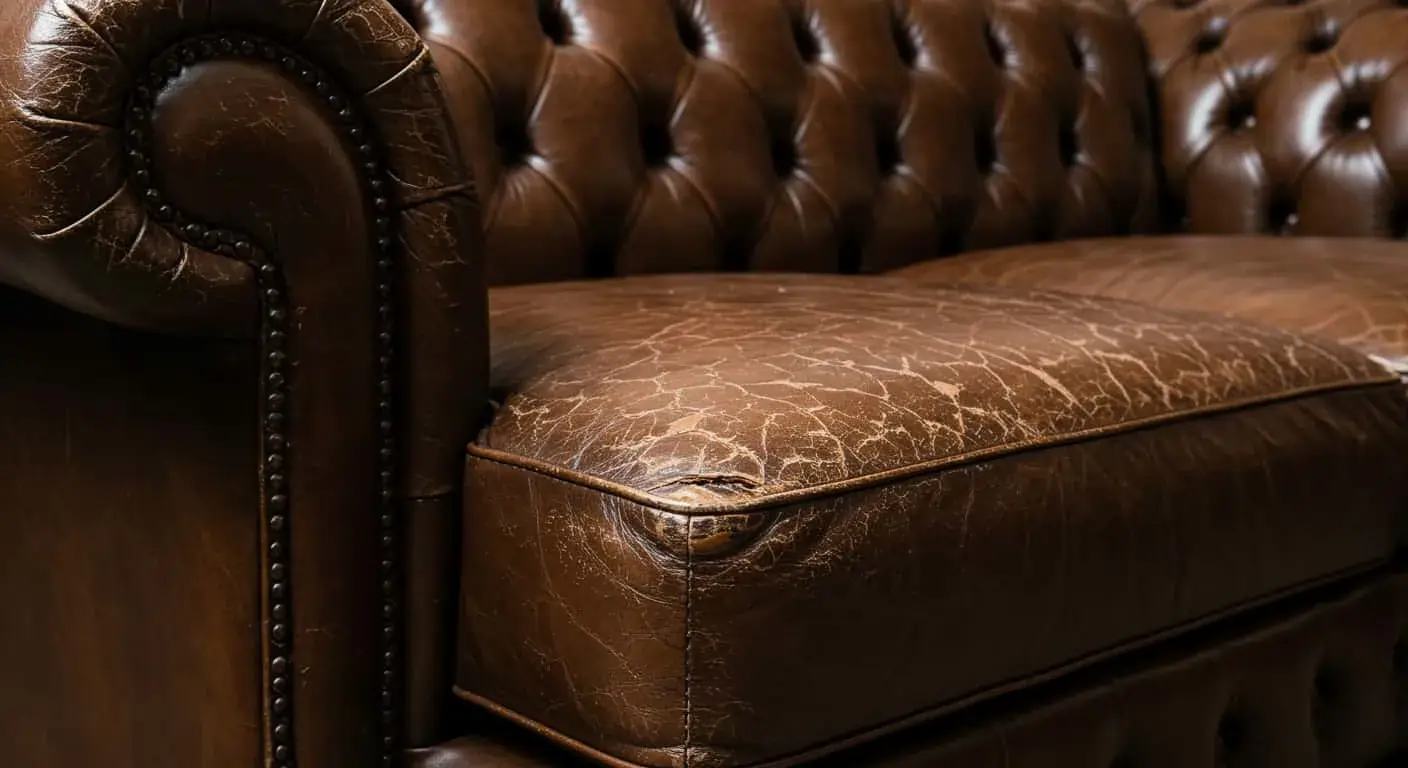
- Opaque pigment over the original grain. The fastest tell. Micro-pigmentation keeps pore visibility under raking light. Painted leather buries the pores under an opaque film. Within a year the painted layer cracks at flex points and peels at seam edges.
- Wrong gloss. A high-gloss top-coat on a sofa that originally read as low-gloss matte or satin. Your sofa looks "shiny" or "wet" , and the mismatch is permanent without stripping the entire finish.
- Visible edge at panel boundaries. Points to failed tonal matching in stage one, or pigment overspray crossing the panel edge in stage four. The boundary gets more visible over time as the restored panel ages on a different curve from the original.
- Sticky or tacky surface six months later. Points to inadequate binder cure or an incompatible top-coat. Your sofa collects dust faster than before and develops a gradually darkening contact zone where people sit.
- Pigment crocking , colour transfers to clothes. The binder did not cross-link correctly or was undersupplied for the pigment quantity. Your sofa starts transferring colour within four to six months of restoration.
- Solvent smell lasting beyond 72 hours. Points to fast-drying paint solvents instead of expert-grade pigment carriers. The hide underneath may also be degraded , solvent that strong is not neutral on a chrome-tanned hide.
"The most difficult workshop intakes are the heritage pieces that have already been painted by a previous restorer. Stripping the painted layer back to original is far more invasive than restoring the original surface would have been. The shortcut leaves a permanent scar in the piece's history."
How to Find a Provider Who Actually Does Micro-Pigmentation
Before booking micro-pigmentation, a few quick questions will separate expert workshops from painters who have entered the market in the last decade.
- Ask to see the reference equipment. A workshop doing micro-pigmentation has a D65 colour-reference light box, an HVLP micro-spray system set to micron-thin deposition, and a documented pigment archive. Any provider who cannot show this equipment is doing something else.
- Ask about brand colour matching by name. A serious workshop names the Pelle SC reference range for Frau, the Selleria range for Fendi Casa, and the right collection names for Natuzzi and B&B Italia. Generic answers mean generic work.
- Ask for all seven steps. If the answer compresses to three or four, the provider is skipping stabilisation, binder lock, or the cured top-coat lamination. Each missing step shows in the result within twelve months.
- Ask about the cure window. A provider promising same-day return on a panel-level micro-pigmentation is not running the 48-hour controlled cure. The bond will not be at full strength when your sofa comes back.
- Ask if they can strip a previously painted surface. A workshop that can strip a painted layer back to the original hide before re-pigmenting works at a higher technical level than one that paints over existing damage.
- Ask for project log references. Expert workshops document every job under a project number with archived macro photography. References are real, traceable, and discussed at technical depth , not glossy before-and-afters with marketing copy.
For owners in Delhi NCR, expert leather restoration in Delhi and the surface refinement service in Gurugram both follow the seven-step process above. Owners in Noida, Faridabad, and Ghaziabad get the same workshop standard through doorstep assessment and the controlled-environment intake that expert-grade work requires.
Why Does Getting This Right Matter for Your Sofa?
Micro-pigmentation decides whether your damaged sofa comes back as the same piece , or as an object that only resembles it. For Italian luxury furniture above the ₹3 lakh range , Natuzzi, Poltrona Frau, Fendi Casa, B&B Italia, Maxalto, bespoke nappa pieces from independent ateliers , the gap between expert re-pigmentation and a painted shortcut is the gap between a sofa that lasts three generations and one that visibly fails within five years.
The numbers back this up. Expert micro-pigmentation costs more per panel than painted-leather refinishing. But your restored sofa keeps the heirloom value of the original. The painted sofa does not. For pieces where resale or generational transfer matters , and on premium Italian leather, it always does , the extra cost is recovered many times over in preserved value.
Most micro-pigmentation jobs at the workshop are fixing damage that proper pH-neutral cleaning, scheduled nappa conditioning, and the seasonal NCR monsoon care steps would have prevented. Micro-pigmentation fixes what should never have failed. Build the maintenance habit and you will rarely need the fix.
If your Natuzzi, Frau, Fendi Casa, or B&B Italia sofa in Delhi NCR already has damage, the right next step is a workshop assessment in raking light. The sooner you book it, the more restoration options are available , and the closer the result will be to your sofa's original tannery finish.