The signal arrives quietly. A faint smudge on the back of a white shirt after sitting on a Frau armchair. A brown mark on a child's pale dress after leaning against a Natuzzi cushion. A worrying shadow on a bedsheet that touched the headboard of a Fendi Casa bed. Your sofa looks unchanged. The clothing tells the truth. Those marks mean the dye complex or pigment binder holding colour to the hide has started to release , and that release will only get worse without action. This article explains the chemistry behind crocking, the simple dry-rub test that confirms it, the three causes behind nearly every case, and the workshop steps that stop the failure before it spreads. Technical terms are defined in the leather conservation glossary; the chemistry references the guides on pH balance, UV degradation, and fat liquor.
What Is Crocking on a Leather Sofa?
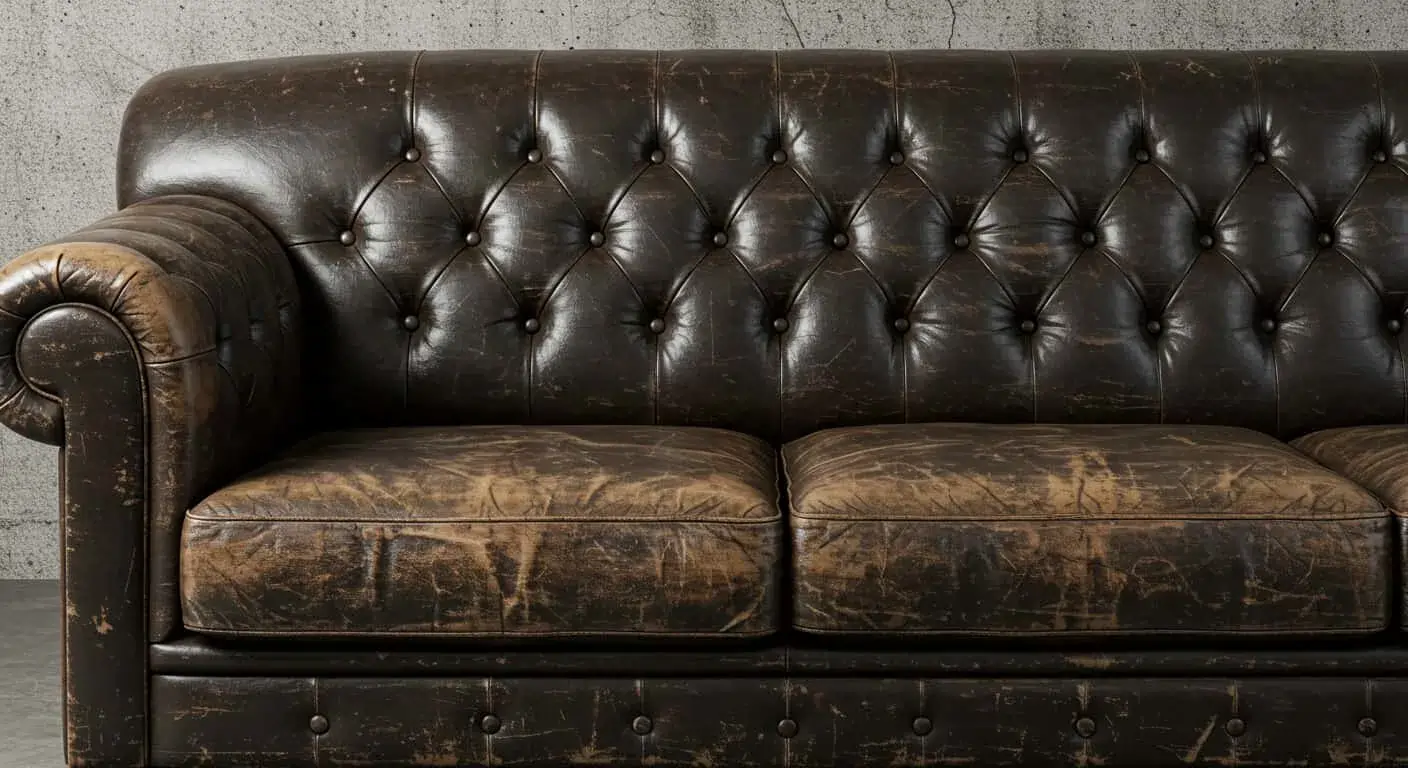
Crocking is the leather industry's technical term for colour transfer from a leather surface onto anything it touches , clothing, skin, lining fabric, throw cushions. The word comes from the leather trade and predates modern dye chemistry. Tanners and merchants have used it for over a century to describe the same failure.
Crocking is not a stain. A stain is contamination sitting on top of the leather. Crocking is the leather releasing its own colour because the chemistry holding that colour in place has weakened. The difference matters for diagnosis: contamination can often be cleaned; crocking needs structural restoration of the dye-binder system because the colour layer itself is failing.
Two forms exist. Dry crocking is colour transfer from a dry surface , the most common form and usually an early-to-moderate failure. Wet crocking is colour transfer when the surface or the fabric touching it is even slightly damp , a more advanced failure that means the binder system has lost most of its water resistance. The four-step test in the section below tells you which one you have.
The diagnostic rule: if a clean white cloth picks up colour after a firm dry rub on the leather, crocking is present. The amount of colour on the cloth indicates how severe the failure is. Once you confirm it, keep light-coloured clothing off that piece until a workshop looks at it , every contact speeds up the damage.
Why Is My Leather Sofa Transferring Colour?
Nearly every crocking case at the workshop traces to one of three causes , or to a combination of them working together. Identifying the right one determines the fix.
1. Wrong-pH cleaning has loosened the binder
This is the most common cause. Repeated cleaning with alkaline household products , dish soap, baby shampoo, all-purpose sprays , attacks the cross-links in the polymer binder that holds pigment to the hide on semi-aniline and pigmented finishes. The binder loosens over months and years. Eventually the pigment lifts under the slightest contact. The full mechanism and the protective steps are in the pH balance of leather guide. Crocking from this cause shows up first on the panels you clean most , seat fronts and arm caps.
2. UV exposure has broken down the dye or binder
Sustained UV exposure breaks down aniline dye chromophores and polymer binder cross-links. On aniline finishes the dye complex dissolves more easily under contact pressure. On semi-aniline and pigmented finishes the binder fails the same way alkaline cleaning does , just more slowly. The full mechanism is in the UV degradation guide. Crocking from UV concentrates on the panels facing the window. The opposite side stays intact.
3. Advanced fat liquor depletion has damaged the hide
This is the least obvious cause. Years of fat liquor depletion , from wrong-pH cleaning, evaporation, and skipped conditioning , eventually damage the underlying hide structure. The collagen fibres become brittle. The grain layer no longer holds the dye-binder system in place. Mechanical contact lifts colour because the substrate beneath the colour layer has given way. The mechanism is in the fat liquor guide; the full cascade is in the science of moisturising. Crocking from this cause usually comes with other signs of depletion , loose grain, surface dryness, loss of drape.
Workshop intake on a crocking case starts with identifying which of the three causes is at work. The dry/wet rub test shows severity. The location pattern, accompanying symptoms, and use history point to the cause. The right fix follows from the right diagnosis.
How to Check If Your Sofa Has Crocking , 5 Minutes
Run four tests in sequence on a hidden area. They take about five minutes total and tell you whether crocking is present and how serious it is.
Step 1 , Dry rub test. Take a clean white microfibre cloth , or any clean white cotton fabric. Press it firmly against a hidden panel: the back of an arm, the underside of a cushion, a hidden seam area. Rub in one direction for ten firm strokes, using about as much pressure as wiping a kitchen counter. Check the cloth. Any visible colour transfer confirms dry crocking. Faint pickup means early failure. Strong pickup means advanced failure.
Step 2 , Damp rub test. Lightly dampen a fresh section of the cloth with distilled water , damp, not wet. Repeat the rub on a different hidden area. Compare the colour pickup to the dry test. More colour transfer on the damp test confirms wet crocking, which means deeper binder failure. If the damp pickup is dramatically stronger than the dry, the failure is moderate to advanced.
Step 3 , Map the affected zones. Once crocking is confirmed, test the whole piece. Check high-contact zones (arm caps, seat fronts, headrests, main seating positions) and low-contact zones (back panels, far ends of sectionals). The pattern indicates the cause: high-contact zones only suggests cleaning damage; the south-facing side only suggests UV; uniform crocking across the piece suggests fat liquor depletion.
Step 4 , Check for accompanying symptoms. Look under raking light [light held at a low angle to show surface texture] at 5x magnification for micro-cracking, loose grain, dulled top-coat, or pigment lift. Crocking with surface cracking points to UV. Crocking with surface dryness points to fat liquor depletion. Crocking with neither points to wrong-pH cleaning.
These four steps give the workshop enough information to scope the fix before your sofa arrives.
Which Leather Finish Is Most at Risk?
Different finishes crock through different mechanisms and at different rates. See the broader finish identification guide on aniline, semi-aniline, and pigmented finishes for background.
Aniline
Aniline is the most vulnerable to dye-based crocking. The transparent aniline dye sits directly in the hide fibres with no protective opaque coat to absorb mechanical contact. Wrong-pH cleaning, UV exposure, and fat liquor depletion all show up first as crocking on aniline finishes. Luxury Italian aniline pieces , Frau Pelle SC, Natuzzi Iconic, Fendi Casa Selleria , show crocking earliest in the failure timeline. Recovery requires reintroducing dye matched to the original tannery formulation, usually combined with workshop re-fatliquoring.
Semi-aniline
Crocking on semi-aniline involves the thin pigment layer rather than the aniline dye beneath it. The pigment lifts from the binder before the dye fails. Recovery is through binder restoration and panel-level pigment rebuild , typically a less invasive job than aniline restoration because the underlying dye chemistry stays intact.
Pigmented
Pigmented leather has the most robust polymer top-coat and resists crocking the longest. When it does crock, the cause is almost always advanced top-coat degradation from years of UV plus wrong-pH cleaning, or from the engineered top-coat aging past its design life on high-traffic pieces. Recovery is through top-coat refresh and pigment rebuild via the micro-pigmentation process.
Pull-up
Pull-up finishes can develop a different kind of colour transfer , wax migrating from the saturating wax-oil matrix, rather than dye or pigment lift. The symptom looks like crocking but the cause and fix are different. The pull-up versus pigmented guide covers the wax-oil failure modes in detail.
How Does a Workshop Fix Crocking?
Workshop treatment for crocking runs through four stages matched to the diagnosed cause. The approach draws on the broader micro-pigmentation process, with adjustments specific to colour-transfer failure.
Stage 1 , Stabilisation. The first job is stopping further colour loss. The affected zone is gently cleaned with pH-neutral chemistry to remove any contamination making things worse. The hide dries fully under controlled conditions. Nothing touches the surface for 24 to 48 hours.
Stage 2 , Cause-specific fix. If wrong-pH cleaning caused the crocking, a compatible binder restorer is applied under controlled conditions. If UV caused it, the failed binder or dye is removed through controlled abrasion and the panel is prepared for re-pigmentation. If fat liquor depletion caused it, workshop re-fatliquoring per the fat liquor guide must happen before any colour work , re-pigmenting a depleted hide produces a result that fails again within months.
Stage 3 , Colour rebuild. Where pigment loss has occurred, micro-pigmentation matched to the surrounding undamaged hide rebuilds the colour layer in micron-thin passes. For branded pieces, the documented tannery palette is the reference. For other luxury pieces, the undamaged hide nearby provides the match. The matching steps are in the micro-pigmentation process guide.
Stage 4 , Top-coat lamination. A clear top-coat matched to the original gloss profile seals the rebuilt colour layer. The cure window matters: the lamination must fully cure before the piece returns to use , typically 48 to 72 hours under workshop conditions. Using the piece too early can leave cure marks visible under raking light for the life of the sofa.
The four stages combined typically take three to seven workshop days, depending on the size of the affected area. Catching crocking early , within months of first noticing it , keeps the fix to panel level. Crocking left for years spreads into binder failure across multiple panels and can require whole-piece restoration running into the lakhs.
"Crocking is the leather telling you that the chemistry is failing before the structure does. Listen to it the first time it appears. Wait, and the conversation gets expensive."
How Do You Prevent Crocking Before It Starts?
Crocking is one of the most preventable failures in leather ownership because all three causes are within your control. The same care routine that prevents crocking also protects the wider chemistry of the hide.
pH-neutral cleaning chemistry only. Generic household cleaners are the leading cause of binder failure that leads to crocking. The right approach is in the pH balance guide , pH 5.0 ± 0.5, applied through the seven-step cleaning procedure.
UV protection on south-facing pieces. The steps are in the UV degradation guide: 99% UV-blocking window film on directly exposed windows, layered curtain protection where film is not an option, and quarterly cushion rotation to even out exposure.
Scheduled conditioning to prevent fat liquor depletion. The guidance is in the science of moisturising: every 6 to 9 months for aniline pieces, every 8 to 12 months for semi-aniline, and once a year for pigmented. Delhi NCR's seasonal climate tightens these intervals to account for the four seasonal phases.
Owners who keep all three routines rarely see crocking on luxury Italian pieces across the full service life of the leather. Skip one or more and crocking appears within five to ten years. The cost of prevention is a small fraction of the cost of fixing it.
If you are in Delhi NCR and suspect crocking on a Frau, Natuzzi, Fendi Casa, B&B Italia, or any premium aniline piece, you can book leather restoration in Delhi, surface refinement in Gurugram, or a doorstep assessment across Noida, Faridabad, and Ghaziabad. The workshop intake starts with the four-step crocking test and continues with a cause-specific fix.
Bookmark this page. The next time a faint colour mark appears on a white shirt after sitting on your leather sofa, the test is here to confirm whether crocking is the cause , and the steps are here to start the conversation with the workshop.